Table of Contents
- Disclaimer for How To Build a Cat Cage
- Introduction
- 1. Required Tools
- 2. Materials
- 3. Tips
- 4. Cutting the base corners
- 5. Building the floor
- 6. Building the frame
- 7. Installing the wheels
- 8. Installing some tile
- 9. Building the long shelf
- 10. Building the top shelf
- 11. Building the bottom shelf
- 12. Building the top door
- 13. Building the bottom door
- 14. Building the lid
- 15. Finishing up
- A. After Thoughts
- B. Feedback
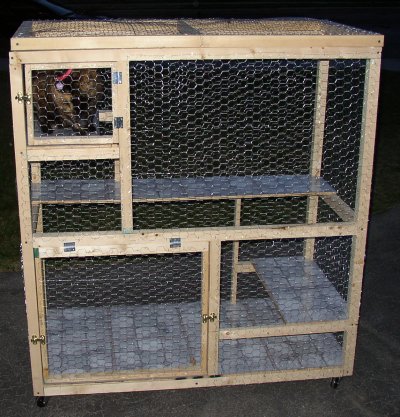
Abstract This howto describes one possible model for building a cat cage (or Kitty Condo, as some like to call them). The cage presented in these plans will be 4' wide by 2' deep by approximately 4' 4' tall (depending on the size of the wheels). |  |
In these sue-happy times, I am compelled to disclaim responsability. Please bear with me.
The author provides the following instructions free of charge. The author provides no warranty for the accuracy of these instructions. The author is not responsible for any damage, injury or death that may result from use or misuse of these instructions.
This cage is intended for stationary use only. Do not move the cage while cats are in it, or injury may occur.

This howto details one plan for building a cat enclosure. If you do not feel comfortable making your own measurements and cuts, this howto is not for you. First, a little background.
I had a dilemma. My wife and I agreed to foster some kittens until the local rescue agency could find home for them, but we did not have a kennel for them. A good size cat cage costs anywhere from $300 to $500, and that's just a bit too much.
I decided that I would build a cage. Running immediately to my nearest Internet search engine, I was disappointed to find very little help. Several people talk about having built a cat enclosure, but I only found one set of plans. Time for plan "B".
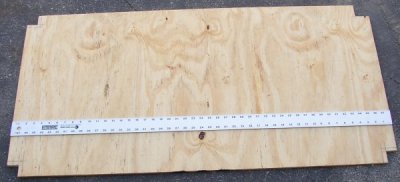
I began to visualize what I wanted in a cat enclosure. It had to be able to fit through a door, be on wheels, be easy to gain access to, and be easy to clean. I found a scrap piece of plywood in my garage that measured 4'x2', and decided that was a good size for the floor of the cage. The rest of the plans are built around this.
My only qualification for this project is that I have watched a few too many episodes of Home Time. The instructions that follow describe 4'x2'x4' high enclosure. In the pages that follow, I share my experiences, including how I fixed my mistakes.
Table of Contents
You should already be familiar with how to use each of these tools before you begin.

- Safety Goggles
- Ear plugs or Ear Muffs (if you use power saws)
- Gloves
- Wood Pencil
- 4' straight edge (3' is okay, but harder to work with)
- Tape Measure
- Cutting blade
- Saw Horses or a work bench
- A square (triangle looking ruler)
- Wood Saw
- Hack Saw
- Hammer
- Screw Drivers
- Staple Gun
- Pleanty of staples
- Pliers
- C-Clamps and/or Quick Grips

All of the materials you need should be available from your local Home Depot or Lowe's. Remember, it may be a good idea to buy a little extra, in case you make a mistake. Many of these stores will allow you to returned unused materials. I put an estimate of what I paid for the materials to give you an idea of what to expect.
- 10 2"x2"x8' boards - $1.86 ea (1.5"x1.5" acutal, suggest 1 extra)
- 2 1"x2"x8' boards - $0.89 ea (.75"x1.5" actual, suggest 1 extra)
- *4'x8'x1/4" plywood - already had scrap, est. $10
- 4'x15' chicken wire - $17 (I had to buy 25' because 15' was not available)
- 16 1'x1' self adhesive tiles - $0.29 ea (suggest 2 extra)
- **5 2" castors - $3 ea (wheels that spin in any direction)
- Box of Staples - $2.67 (for your stapler)
- Box of 2 1/2" - $3 nails
- Box of 2 1/2" wood screws - $4 (I like self drilling masonry screws)
- Box of 1 1/2" wood screws - $4
- 2 pair small hinges - $1.67 ea
- 1 pair medium hinges - $2.29
- 4 latches - $2.86 ea (1 for top door, 2 for bottom door, 1 for lid)
- ***Some wood trim (optional)
- ****Paint - $15 (optional)
- *****Screen (optional)
* Many home improvement stores will cut your wood for you. This is a really good idea as far as the plywood goes, especially if you need to fit your materials into a car. Either you or the store will need to cut the plywood into a 4'x2' piece, 4'x10" piece, then 2 2'x1' pieces (cut a 4'x1' piece, then cut that piece in half). That will leave you with a 4'x4'2" piece, which you may want to keep for your next project.
** The castors are optional, but recommended. If you do not plan on ever moving your cage, you can save a few bucks and get rubber feet instead of the wheels.
*** Wood trim can make a good lip for shelves, so it's harder for the cats to knock bowls off of them, and also for covering the edges of the chicken wire on the outside of the cage.
**** These instructions do not cover painting, so if you would like to paint your cage, you are on your own.
***** If you are planning to keep an open litter box in the cage, it is a good idea to install screen around the bottom of the cage to keep the litter from splashing all over your floor.
So you are looking at around $100 to $125 depending on what you but and sales tax.
Read through all the instructions before beginning.
Make sure you review the "Afterthoughts" chapter before you get too far into the project. If you want to add any of the features I mention, they will be easier to add before the cage is together.
Use the pictures of the completed page as a reference when you are not sure where a shelf or door should go.
This does not need to be a solo project. Things may go a lot smoother if two people work on it together.
Use your safety goggles. You never know when a stray splinter, dust, or chicken wire might hit you in the eye.
Measure twice. Cut once.
An electric screw driver or drill will make things go a lot faster.
Put a drop or two of wood glue on joints before screwing them together. This will help make the cage more durable and stable.
Make sure all joints are screwed together tightly. If there is a gap between the joints, remove the screw and try again.
Keep your cage clean for a healthy cat!
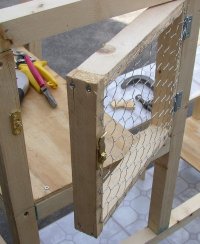
 The first thing I did was to cut squares out of each corner of the floor board. These measurements assume that your 2"x2" boards are actual 1.5"x1.5". If not, you will have to make your own measurements. This cut will allow the 2"x2" corner boards to attach through the plywood floor to the boards under the floor. On your 2'x4' piece of plywood (that's feet, not inches), measure a 1.5"x1.5" square in each corner. Mark the square with a wood pencil. |
 Check your measurement. As you can see in the photo, I got it wrong the first time, when I thought the 2"x2" boards were actually 2"x2". Cut each corner square out with a hack saw (or jigsaw if you have one). After each cut, measure to make sure the cut was big enough. It is a good idea to take a 2"x2" board, and fit it into the corner, to make sure it sits flush with the edge of the plywood. If the board is a bit sunken in, that is okay. If the board sticks out beyond the plywood, you need to increase your cut. |
 After you have all four of these cuts squared away, you will be able to begin measuring for your foundation boards. Keep the corner pieces you cut out! You will need them later. |
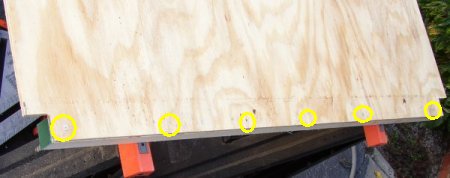
 You should now have a sheet of plywood with four corners cut out. If you have a 4' straight edge, you can see how easy it will be to measure pretty much anything you need for this project. In this step, you will be attaching boards to the bottom of the floor to give it enough strength to support the weight of the cage, cats, and accessories. You will be cutting 2"x2" boards for this step. You will require approximately 1 1/4 8' boards. If your 2"x2" boards are not 1.5"x1.5", then you must take your own measurements. We are cutting these beams based on the the floor being 48" wide by 24" deep, minus the 1.5" for each square cut out of the corner of the board. Cut two (2) 45" beams out of the first board. Cut three (3) 21" beams (you should be able to get two from the first 2"x2", and the third from a second 2"x2"). |
 After you finish cutting the beams, you are ready to assemble the floor. I highly recomment using glue when attaching the beams to the floor. Place a line of wood glue along the edge of the floor before you attach a beam. Do not use too much, or it will seep out and make a big mess. |
 Now place the beam on the edge of the floor where you have put a line of glue, and use two or three clamps to hold it in place. The clamps will hold the beam in place while you screw the floor to the beam. If you are using a C-clamp, it is a good idea to use scrap wood between the clamp and the floor to prevent the clamp from damaging the floor. |
 Instead of C-clamps, I am fond of using Quick Grip clamps. These clamps lock into place as you squeze them, and have a protective rubber mouth instead of raw metal, so you do not need extra wood to protect what you are clamping. Comparatively, the quick grip clamps attach in a couple of seconds, as opposed to a minute or two of fussing with a C-clamp and scrap wood. |
 Once you have firmly attached the beam to the floor with clamps, turn over the floor and attach the beam to the floor with 1.5" wood screws. You will be screwing from the top of the floor into the beam. I suggest six (6) screws for each 45" beam and three (3) screws for each 21" beam. |
 Once you attach the beam with screws, remove the clamps. You should have something that looks like this. |
 For the middle 21" board, measure to the middle of both 45" boards. This should be 22.5" inches. |
 Don't forget to lay a line of glue before attaching the center board. |
  Screw the 21" center board to the 45" side boards on each side with 2.5" wood screws. It is a good idea to visually verify that the screw will go all the way through the first board. |
 Turn the floor assembly over and prepare to secure the floor to the center beam. Measure to the center of the board, which should be exactly 2' if you are using a 4' wide floor board. Drill 1.5" wood screws into the center beam from the top using the center measurement as a guide. |
 The center of the floor should look like this. |
 Now stand up your floor assembly and look at the bottom. If it looks like an "8" on a digital clock, then congratulations. You have successfully completed the floor assembly. |
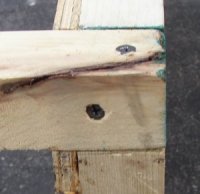
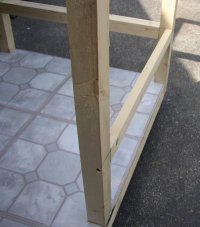
Now that the floor is done, we can start building the frame. You will need to cut some 2"x2" boards first. Again, if your boards are not 1.5"x1.5", then you need to take your own measurements.  Cut six (6) 4' beams. Basically, cut three (3) of the 2"x2"x8' beams in half. Cut two (2) 45" beams. Cut four (4) 21" beams. After cutting your beams, attach the first 21" beam to the center of two (2) 4' beams to form an "H" shape. Place a mark at 2' into each 4' beam, and that is where the screw show go. Screw the boards together using a 2.5" wood screw. When attaching two beams together like this, I like to stand on each beam on the ground while I screw them together to ensure a snug connection. Make sure the ground is flat if you try this. |
 The joint of the joined boards should look something like this. |
 Attach the two "H" sections to the floor assembly. It may be easier to do this with the floor and "H" frame on their sides. |
 When attaching the frame wall to the floor assembly, it is best to drill screws in from both directions. Make sure you offset the the screws (i.e. put one higher and one lower) so they do not hit each other on the way in. |
 Attach the two 4' beams to the top of the "H" frame walls using 2.5" screws. |
 Attach the two 21" beams to the top of each wall as shown in the picture, keeping the all the top beams flush with each other. |
There is, unfortunately, not a picture for this step. Install the two 45" beams on the side walls of the frames. These should be at the same level as the beams on the end walls so that a shelf can be placed on them. Attach these beams with 2.5" screws. Decide which side of the cage will be the front. Measure 2' from the left side. This will be where the large bottom door goes. This door needs to be large enough to allow you to clean and put in or take out a litter box. Measure the height from the floor to the bottom of the center wall beam. This should be approximately 19.5", but use your measurement for cutting the next beam. Cut a 2"x2" beam to fit in the space you just measured. Attach the beam with 2.5" screws, being sure that there is 2' of width between the beam and the left wall beam. |
 Turn the entire cage upside down. Cut four 2" long blocks from a 2"x2" beam. Glue each block to each of the four corners under the floor, as in the picture. Let the glue set for a few minutes. |
 Turn the entire cage right side up. Using 1.5" wood screws, screw the blocks to the floor. |
 Turn the cage upside down again and line up each wheel. |
 Attach each of the four (4) corner wheels with four (4) 1.5" wood screws. For the fifth wheel, I attached the wheel diagonally across the center of the middle floor beam with only two (2) 1.5" screws. |
 Always place the tiles in their desired position before attaching them, to make sure they will fit properly. You will need to cut out bits of the tiles before you attach them to fit around the wall beams. |
 When setting the tiles, try to keep them snuggly together. This will help prevent moisture from getting between the tiles, and make the cage easier to clean. |
 Work your way across from one side to the other. |
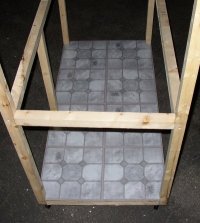 This is a view of the finished floor. |
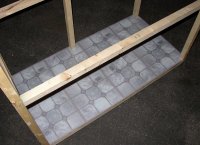 This is another view. |
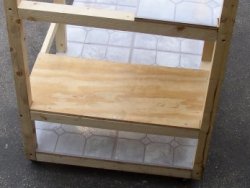
 Cut a piece of plywood to 10" wide by 4' long. It's easiest to have the store cut this for you. |
 Cut out 1.5"x1.5" squares from the two corners that will rest agains the wall beams. |
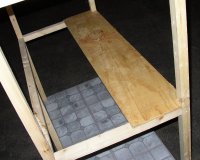 Place the shelf and secure it with 1.5" wood screws. |
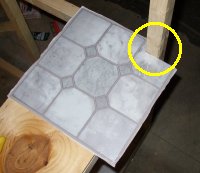 Depending on your preference, you can start placing tile now or wait until you have all the beams in place. Cut the tiles to fit on the shelf. You can usually use scissors or a cutting blade. |
 You may be able to cut the tile in place using a cutting blade. Simply score the tile (make a small cut along the line you want to cut out), and fold the tile and it should snap neatly. |
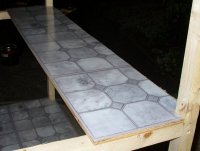 Here is the completed shelf. |
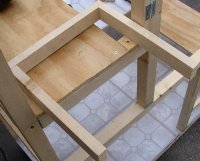
 For the top shelf, cut two (2) 2"x2" beam to 1' long. Measure from the center beam to the top beam and cut two more 2"x2" beams to fit vertically between them. Separately measure the beams for each side of the cage, since the long shelf will cut about 1/4" off of the rear vertical beam. Lastly, cut a 2"x2" beam to 21". It is helpful to use a 1' beam to measure the placement of the vertical beams. |
 Attach the vertical beams to the front and back using 2.5" wood screws. |
 If you have already tiled the long shelf, you will need to cut out a square of tile to allow the vertical beam to have contact with the wood underneath. |
 Choose a height for your shelf. Mark this height in wood pencil on all the verical beams. Then attach the horizontal beams using 2.5" wood screws. |
 Cut a piece of plywood to 1'x2'. Cut 1.5"x1.5" squares from the two corners that will be against the wall beams. Place the shelf and secure it with 1.5" wood screws. |
 Prepare beams for the bottom shelf as you did for the top shelf. I used a 1"x2" beam for the front and back support of this shelf because I was running low on 2"x2" beam. Don't worry. This is pleanty of support. Use a 2"x2" beam for the side wall. |
 Cut a sheet of plywood to 1'x2'. Cut 1.5"x1.5" squares out of the corners that will be against the wall beams. Place the shelf and attach it with 1.5" wood screws. |
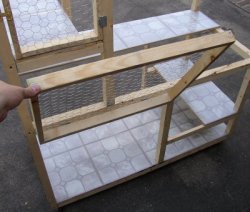
 At this point, your cage should look something like this. |
 I didn't want a gap under my top door, so I took scraps of plywood, and filled in the space to the beam, as shown in the picture. |
 You will be making the door out of 1"x2" beams. When measuring for the door, make sure you insert a tile on the shelf so you take the proper measurement. Make the left and right door beams measure from the shelf floor (with tile) to the top beam, minus about 1/8" to allow the door to swing without scraping the shelf or ceiling. When measuring the top and bottom beam for the door, remember to subtract the side beams from the measurement. Again, subtract about 1/8" so the door has room to open. This next part is a matter of preference. For this door, I decided to attach the side of the door to the hinges first. This means that you have to take the door side off when you attach it to the rest of the door. I suggest building the door, and then clamping the whole assembly to the cage beam. |
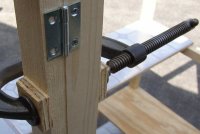 With the door firmly clamped in place, attach a pair of small hinges, being careful to keep the hinge centered between the the door board and cage board. It is important to keep the screws in the centers of the holes in the hinge. If the screw is too far toward the inside of the hinge, then the pressure created will cause the door to pop open. |
 This is a picture of the side beam of the door attached to the cage. |
 Test to make sure that the door will be able to swing all the way open. |
 Start to assemble the door, making sure that the top and bottem beams go between the side beams of the door, and not on top and bottom of the side beams. |
 If you attached the side beam to the hinges already, take it off. You will want to mark which end is up with a wood pencil, and then attach the rest of the door frame on the left side of this beam. |
 Attach the door. You can go ahead and attach chicken wire to the door now. This can help you feel like you are making progress, because the door will be completely finished. |
 When unwrapping the chicken wire, wear your safety goggles. These rolls are usually wrapped in a thin wire that can unexpectedly whip around and hit you in the eye. It is also a good idea to wear gloves, as chicken wire has a lot of sharp ends. |
 Cut out a piece of chicken wire bigger than the door. Attach the wire, then use your fence cutters to trim off the excess. Use a pair of pliers to bend back any wires that are sticking out so no one cuts theirself while opening the door. There will probably be a lot of wire to bend back, but it's worth the effort. Install the latch on the door and side beam. |
 Congratulations. You have finished the top door. |
 Measure for the bottom door. I build the bottom door out of 2"x2" beam for the top and 1"x2" beams for the rest of the door. I used a thicker top beam because this door is heavier, and I thought it could use more strength at the hinges. When measuring, make sure you put a tile down on the floor, if you have not already tiled it. Leave about 1/8" gap at the bottom of the door to give the door room to swing open without scraping the floor. Also leave about 1/4" inch gap for the sides of the door (that is 1/8" for each side). The top and bottom beams should be the width of the door, and the side beams will go between them. On my project, the top and bottom beams were 23.75", and the side beams were 19 1/8". Still, take your own measurements. |
 Attach the door by using clamps again to hold it in place while attaching a pair of small hinges. Keep the screws for the hinges in the center of the hinge holes, or you may have trouble opening or closing the door. You can go ahead and put chicken wire on this door now, using the same method as for the top door. |
 Test the door to make sure it opens and closes freely. Install latches. I put latches on either side of the door so the cats cannot bend a side of the door because it has no latch. |
 At this point, I had just enough wood left for the lid (I did not buy extra beams, so it's a good thing I did not make any mistakes while cutting the wood). The perimeter of the lid is all 2"x2" beam, and the center beam is 1"x2". Cut two (2) 4' beams (i.e. cut a 2"x2"x8' beam in half). Cut two (2) 21" beams from 2"x2" beam and one (1) 21" beam from 1"x2" beam. |
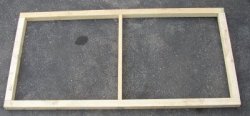 Assemble the pieces to form an "8" shape. |
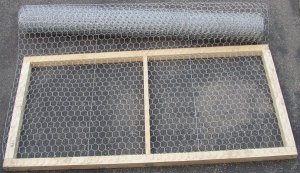 Cover the top of the lid with chicken wire. Pull the wire tight as it will tend to stretch anyway, and will bulge if it is too loose. |
At this point, if you have not tiled the floor or shelves, do it now.  Carefully unwrap and attach the chicken wire to the outside walls of the cage, trying to keep it stretched. I advise using an excessive number of staples to attach any part of the chicken wire that the cats will be leaning against, or this area is more likely to break under the stress. |
 Phwew! Almost there. All that is left is to attach the lid. |
 Attach the lid to the top with hinges and latch, and you're all done! Add a cat for size. |
 I think she likes it. |
 And finally, who it was all for. With a nice warm blanket and a litter box, our rescued kittens can settle in until they're old enough to be adopted. |
I had a few realizations hit me after I finished the cage.
The cage needs more doors. I will need to add a door on the first shelf on the bottom left, and on the middle shelf, probably under the third shelf.
The kittens like to push their bowls off the shelves. I will need to add a piece of trim to the edge of each shelf to make a lip that he bowls will be harder to get over. This will require that I cut away some of the tile to make room.
If you would like to share feedback about this project, you can send an e-mail to the author at <isaac(at)noscience.net>. You will of course have to change the (at) to an @ sign.